Introduction
Before reading this Tutorial, the reader should first review the Unipolar and Bipolar Stepper Tutorials. With a grasp of basic Stepper control, you are now ready to tackle the more sophisticated aspect of stepper theory: Current Control.
There are several reasons for implementing current control…
– Avoid Overheating
– Accommodate a variety of Motors
– Increase Torque at higher speed
– Increase Top Speed
– Improve Power Efficiency (with Chopper style circuit)
In its simplest configuration, a stepper motor draws its rated current when connected to its rated voltage. The purpose of this ‘rating’ is to give the circuit designer guidance as to when the motor will over-heat. ie. How much current can continuously run through the windings without overheating the motor. A motor should not over-heat (when appropriately mounted) if connected to its rated voltage. Of course over-heating is what we strive to avoid, since it adversely effects the performance of the motor and even presents serious safety issues.
However, the exact operating voltage of a particular motor may not be available and, as we will see, it may be desirable to drive a motor from a supply voltage higher than the rated voltage (with proper current limiting). You can always drive a stepper with less than the rated voltage, the motor will simply run at less than its full torque capability.
When the operating voltage is higher than the voltage rating of the motor, the simplest way of limiting the current through the motors windings, thus staying within the safe operating range of the motor, is with a current limiting resistor. (Drivers that employ this method of current reduction are known as L/R drivers, L=Inductance, R=Resistance) This resistor, placed in series with the winding diverts some current from the winding and dissipates it in the form of heat.
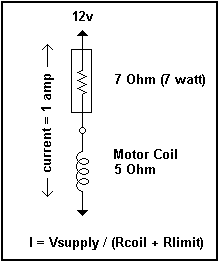
The voltages and current in this simple circuit can be analyzed as a simple resistive voltage divider. It is important to note that because of the small resistances we’re talking about here (1 to 20 ohms) a special type of resistor is needed, called a ‘power’ resistor. Power is expressed as Watts = Volts * Amps, and a little calculation shows that the resistor needed can easily exceed 10 watts, which translates into a lot of heat! (You should not experiment with current limiting resistors without understanding of the concept of power.)
One can devise other ways to reduce the current, with transistors instead of a resistor, but you will face the same heat dissipation problem. When you attempt to linearly regulate the current flow within a circuit, you will always face a heat problem. Fortunately there is a technique, known as ‘Chopping’ , which can limit the current in the winding without generating excess heat. It is quite elegant and efficient. The essence of chopping is to switch the operating voltage on and off at a frequency higher than the operating range, and allow the motor itself to act as a filter, You may be familiar with this concept through Pulse-width modulation, in which the ‘duty cycle’ (percentage of on time) determines the behavior of the motor or whatever is being controlled. One common application of this type of circuit is the electronic light dimmer switch.
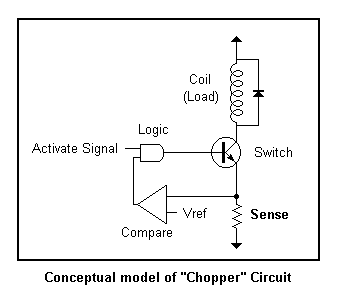
Now let’s look at a conceptual model of a “Chopper” circuit. When an incoming “activate” signal is received, the load (our stepper coil) is switched on. Current through the coil is developed as a voltage across a “sense” resistor. This voltage is proportional to the amount of current in the coil and forms an important part of our feedback sensor. The value of this resistor is very low, typically 1 ohm, which equates to 1 amp, when the voltage at the sense resistor is 1 volt.) The sensed voltage is compared with a reference voltage, and when the sensed voltage becomes greater than the reference the logic switches the coil off. When the voltage drops below the reference voltage the coil is switched back on, unless of course the incoming activate signal is removed, in which case the coil is always off. Thus the feedback logic flips the switch on and off when the current is too high or to low, maintaining a constant amount of current. The reference voltage is typically adjustable which allows us to match the current in the circuit to the motors rated current.
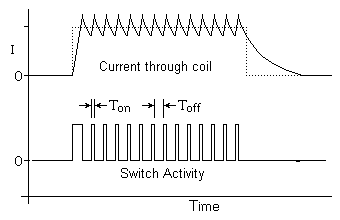
If we were to look at the waveforms of the chopper circuit we would see the current through the coil (top waveform) increase and then sawtooth about the desired current setting (as determined by the reference voltage.) The waveform below indicates the switch activity logic turning the coil on and off at high frequency (typically 20Khz for stepper circuits.)
Now let us look at the ways in which the stepper benefits by using this current control method.
Accommodate a variety of Motors
The reference voltage in the feedback circuit described above is usually adjustable and provides a mechanism for regulating the amount of current in the coil(s) of our stepper motor. The reference voltage is typically set with a potentiometer or a single resistor. The supply voltage in a chopper design should be at least twice the rated voltage of the motor, in order to allow the switching action to occur. If the supply voltage were equal to (or less than) the motor voltage no chopping action can occur (at full rated current), since the current would never exceed the rated current. In fact, as the motor turns faster the current in the motor drops and we lose the current regulating effect. So, in addition to ‘limiting’ the current, a chopping circuit actually helps maintain a constant amount of current, independent of load and motor speed.
Increase Top Speed
Let us now look at an important reason for current limiting – to increase the top speed of the motor. The coils in a stepper are inductors – when you apply a voltage, it takes time for the current level to increase. This is very much like feeding a square wave through a low pass filter – the current increases and decreases in a logarithmic fashion. The rise and fall time in reaction to an input step waveform is known as the ‘slew rate’. It takes time for the current to ‘slew’ from one level to another. When the step frequency is low, this logarithmic slope doesn’t affect the performance of the motor, since there is plenty of time for the current to reach full level relative to the step rate. However as the step rate approaches the time it takes for the current to ramp up, it begins to have an effect on the motor performance. The current does not have enough time to reach full value before the next step reverses the current flow. This is illustrated in the graph below.
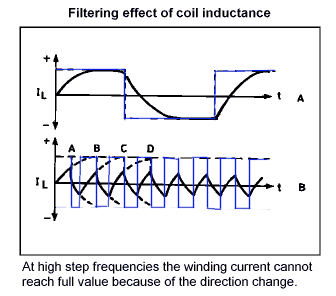
As you can see, when the step frequency is low (A) the current has time to reach full, ideal level. But, as the step frequency increases the current cannot reach full level, before it must reverse direction. The resultant waveform (B) is a wimpy, under-performing version of what we want, that gets worse and worse as the step frequency increases. In terms of motor performance, the motor loses power the faster we step until eventually there’s not enough power to keep the motor spinning.
The solution to getting a better slew rate (a current waveform with sharper attack) is to increase the supply voltage. This decreases the time necessary to charge to full level, resulting in a ‘squarer’ looking waveform. However, now there’s a problem which must be addressed – we will have too much current in the circuit. This current MUST be limited. We want the better slew rate without over-heating the motor. There are 2 solutions and their effect can be seen in the graph below.
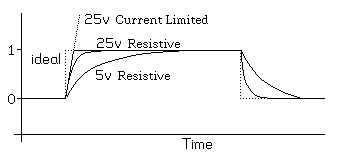
The Square wave is the ‘ideal’ waveform. The 5v resistive waveform is what we get with a 5v motor running at 5v. We can improve the slew rate by adding a current limiting resistor in series with the motor and increase the voltage to 25v, as seen in the 25v resistive waveform. But the best performance is obtained with our chopping (Current Limited) circuit which can turn on the current with the sharpest attack and simply switch it on and off to maintain this level.
It is very important to note that the 25v resistive method has some serious implementation issues. First, you should use a non-inductive resistor. Many power resistors are wirewound, which have inductance of their own, and this brings the problem right back! It’s like putting another coil in series with the coil, the current is reduced but the inductance is increased with little or no improvement in the slew rate. Second, the there are some serious power issues if you were to attempt to limit a 5v motor to be powered from a 25v power source. 4/5 of the power would have to go into the current limiting resistor! This is a tremendous waste of power, not to mention all the heat that must be dissipated. Also, the current limiting resistor would be physically large with a large power rating, greater than 20 watts. Clearly, the best solution is our chopping circuit. The chopper circuit offers not only the best performance, but is also the most efficient!
Summary
In summary, current control offers several advantages– It can accommodate a variety of motors with a simple adjustment to set the current. The top speed of the motors is increased with the Chopping Current control method, which uses a high voltage to achieve current waveforms with quick rise times. The torque curve of the motor is smoothed out over the operating range of the motor speeds because the current, rather than voltage, is maintained at a constant level. And of course, we achieve power efficiency by not generating excess heat in order to achieve these desirable characteristics. Steppers have been around for many years. Chopping current control is fairly new for Stepper Motor control, and offers many improvements over the old L/R type drivers.